Sunday, 9 February 2014

How To Root Motorola Moto G - Win/Mac/Linux

6 comments

Root your Motorola Moto G -- (Windows/Mac/Linux)


Moto G has finally arrived in India and is selling hot. Really hot! 

For one thing Moto G has all the specs an ideal smartyphone user wishes to posses and whats more , it is available at a neat price of Rs.12500 which may come down soon. Its really a Bang for the Buck. 

Adreno 305 GPU, Snapdragon 400 Quad core CPU, 1 GB RAM, HD Recording, 720p Resolution with stunning 326ppi on a 4.5 inch display. Running on the Android Jelly 4.3. Now Samsung and the other s really have to be afraid.


After its release , Modaco member PaulOBrien managed to root this device. This method is extremely simple in design as there  is no need to flash any partitions, no messing with the contents of your data partition, no overwriting the shipped ROM on your device.


Warning:

  • Rooting your device will void any kind of warranty you posses on the device. Make sure that you do this at your own risk. Unrooting will bring back warranty, currently the unrooting methods are only in development.
  • You need to unlock your bootloader to begin the rooting process. Visit the motorola site as thy have provided information on how to do this- Its really straight forward.- Unlock bootloader
  • Rooting may affect your ability to get Future OTAs.

Downloads:


Let's Begin:


  • Download the Superboot zip file above and extract to any directory ( Desktop will be better).

  • Turn off your Moto G

  • Hold down the Volume DOWN+Power buttons together and you should boot into the bootloader mode on Your Moto G.

  • Windows :: Run the superboot-windows.bat as Administrator (Right click->Run As Administator) 

  • MAC :: Open a terminal window to the directory containing the files, and type 'chmod +x superboot-mac.sh' followed by 'sudo ./superboot-mac.sh'

  • LINUX :: Open a terminal window to the directory containing the files, and type 'chmod +x superboot-linux.sh' followed by 'sudo ./superboot-linux.sh'

  • Now the rooting process will automatically start and you will be notified when it finishes. 
You have successfully Rooted Your Motorola Moto G !


...
Read full post »

Sunday, 15 December 2013

Root Nexus 7 2012 [wifi] Using Wug's Nexus Root Toolkit-All Android Versions

9 comments

How To Root Nexus 7 [wifi] 2012 Using Wug's Toolkit


[ Applicable To All Android Versions Up To- 4.4.2]
[ This Tutorial Is Based On Android 4.4.2 Kit Kat an Wug Toolkit v1.7.9 ]

Nexus 7 is one of the most reputed tablets available in the android market. Equipped with amazing features and unbelievably low price. This extremely rare combination, made the Nexus 7 the best selling Android tablet.

All that power and you feel like chained. Unable to explore the world of rooting which lies beyond.?
Well you just can't use the Nexus 7 Without rooting.

Warning: 


  • Rooting voids all kinds of warranty. Do this at your own risk.
  • Make sure your device is charged at least 60%
  • Back Up all your Personal Data-It will get wiped out during the process.

Let's Begin:


Part 1: Setup

  • Download Wug's Nexus Root Toolkit- Link
  • Install Root kit on your PC
  • It will automatically start Toolkit after installation, if it doesn't start manually.
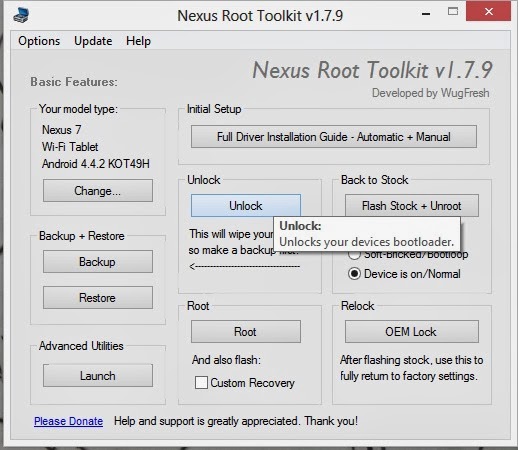
  • Now it will ask to specify your Nexus device and android version. I have selected My Nexus 7 2012 Wifi model and , Android 4.4.2 Kit Kat (KOT49H). You could choose your version as such.


  • Now It display a window regarding USB connection methods. You have to enable USB Debugging.
  • By default, the developer options are unavailable in setting menu. For getting it, go to "About tablet" in settings-->tap on Build number for 7 times, it will display a message that " you are now a developer".
  • Now go to settings-->Developer Option-->Enable USB Debugging
  • You also need to uncheck "MTP" option in "USB connection" (from Storage option


  • Now it will download the boot images and recovery images. Make sure you have internet connection available at the time.


  • After downloading is complete your Toolkit is up to date and ready to roll.

Part 2 - Unlocking


  •  Open Wug's Toolkit


  • Now click on "Unlock" option. Now you will get a message about unlocking. It warns us that all of the data stored in the device will be wiped out. So it is of utmost importance that you back up all your apps and data. Also the tool kit has a backup feature which can backup all your data+app and media files.


  • Press OK to continue. Now it will ask you whether to auto reboot into boot loader mode first. If you have connected the device while its on via usb debugging then, the toolkit can automatically send the device to bootloader mode.
 
  • Press Yes, if your device is powered on. Otherwise read the instructions it has provided.
 
  • After pressing OK, it will start the process, messages will be displayed on screen like "Checking ADB status"..., " Device Connected"... "Rebooting your device into Bootloader"..." Fastboot Status"...
 
  • If a message is displayed saying that the device isn't connected, just redo the steps and try again.

  • Now on your device you will see a new window showing " Unlock Bootloader". Navigate using Volume keys and select "Yes "using Power key. the unlocking process will initiate.

  • After the process is finished, the device will reboot. While on the computer screen, you will see a new message box, containing a list of instructions. These are important. So go through it.
  1. once the rebooting is complete, you will have to go through the initial setup or you can skip it.
  2. Enable USB debugging on your device.
  3. You are ready to root. Finish this by clicking " OK" 


You have Successfully Unlocked Your Bootloader. Next Up is Rooting Your Nexus 7.


Part 3- Rooting Nexus 7


  • After successfully unlocked , we can safely continue to rooting.
 
  • Next on the tool kit press Root. Below root button,you can choose whether to install Custom recovery or not. Its best to tick that option or it wont do any harm even if you dont tick it. If you want a custom recovery like CWM touch/ TWRP then tick it and start.
Also In order to choose which recovery you need. Go to Option-->Options-->Custom recovery Tab and select anyone you like ( CWM/TWRP)


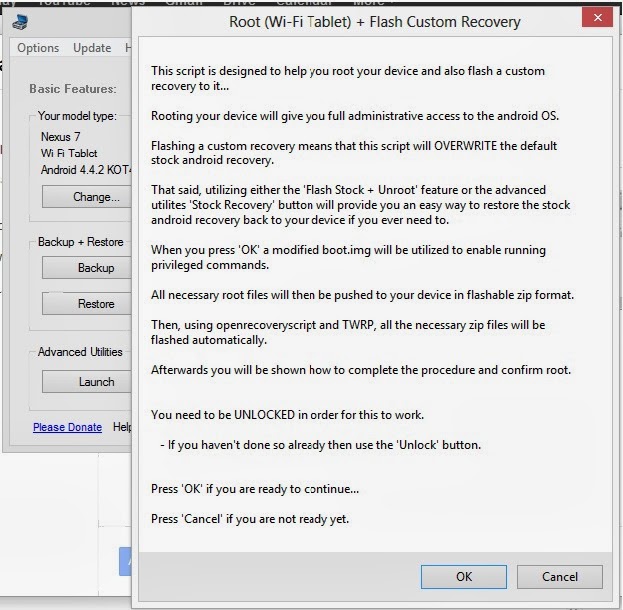
  • Now Click on the Root Button and you will receive a message showing some info on rooting and few instructions.


  • Press OK and it will continue with the rooting process.

  • After some time the process will be completed, the toolkit will push SuperSU and other apps into device. When the process is complete , you will receive a message with instructions to update binaries of SuperSu.

  • open app drawer , tap on SuperSU. It will ask you to update binaries. Press continue, make sure you have internet connection. after complettion, press OK. Now go to BusyBox installer and then Grant Super user permissions. 

There you go you have successfully rooted your Nexus 7. Enjoy!

Feel free to comment...


Read full post »

Sunday, 11 August 2013

How To Unlock Any HTC Device Bootloader [ Steps-Guide]

9 comments

How To Unlock any HTC Device Bootloader Easily[Steps]


HTC has been supportive enough to help us in unlocking their devices bootloader. This step is most important for development purposes. A must for Rooting, installing custom Roms, and many other uses. The entire process of unlocking bootloader is quite lengthy and heavy. With proper care we can do it with ease. I have made a detailed guide on how to unlock bootloader on any HTC device.


Warning:

Unlocking the bootloader of any device causes its internal memory. Be sure to backup all data,photos,contacts etc..
  • HTC device will lose its warranty if bootloader is unlocked.
  • We aren't responsible for any damage happened to your device.
  • Make sure your device is fully charged
  • This works only for STOCK ROMS
  • Install HTC SYNC
  • Make sure you have all the required drives installed on your PC
  • Java Runtime Environment required.


Let's Begin:


Step 1

  • Install HTC Sync 

  • Now extract all its content to Main Drive( C:\android). 

Step 2

  • Now you have to visit htcdev.com.
  • Log in if you already registered, or fill a new registration. 
  • Open "Unlock Bootloader" Section on site and click on "Get Started" icon.
  • Select your device from the drop down list. ( if your device isn't listed. No need to worry, just select "All Supported Model". You will be fine )
  • Click on " Begin Unlock Bootloader"
  • When they ask for your permission just press "YES".
  • Tick the boxes in Legal Terms and press " Proceed to Unlock Instructions"

  • Follow the instructions as written on the HTC site. After you follow all 4 Steps on site. Click on " Proceed to Step 5". We have already completed step 5. Copied the tree files from zip file to C:\android.

Step 3

  • open command prompt ( Start->Run and type cmd.)
  • In command prompt type,  
cd c:\android
fastboot oem get_identifier_token
  • Copy the output you see on the screen to notepad. You just require the sequence of numbers and letters. remove everything else.Do not edit "Identifier token start" or End.
  • Paste the edited output inside the My Device Identifier Token box on the HTC’s Developer website, and press the Submit button.
  • Now you will get an email from htc containing an .bin file which has the unlock code. Copy this file to your C:\android folder.
  • Then on cmd , type;
fastboot flash unlocktoken Unlock_code.bin
 
  • You will see a message on your HTC device asking that whether you really want to unlock your bootloader. navigate using volume up key and highlight Yes. Using Power button,select it. Your phone’s bootloader will be unlocked and it will restart automatically. The first boot might take some time though, so be patient.


Once restarted you have an unlocked HTC device ready to explore new a world.
Read full post »

Wednesday, 1 May 2013

Install JellyBean On HTC Explorer A310E Pico [JellySlash] CM10

40 comments

How To Install JellyBean CM10 On HTC Explorer A310E Pico [JellySlash]


HTC Explorer is a great entry level budget android phone with loads of stuff. Thanks to the mighty HTC hardware this little device can power even the jellybean with a 600MHz CPU.

Before Starting: You Can Also Check-

HTC Explorer can really handle the ROM without much lags or any sort of disturbances.

Warning:

Instructions: Must Read 


Before Installing The ROM You have To Install CWM Recovery. It can be done only after rooting your phone. Backup all your Data since installing new rom will erase phone data.
We aren't responsible for any damage happened to your phone. Rooting can Void Warranty. Don't try this guide if you have no idea about rooting or any of the mentioned procedures.


Before Starting:

1. Root Your Phone + Unlock bootloader. Click here for procedure. 
2. You have to install A CWM recovery.- Click here
3. Make sure you have atleast 65% of battery charge to spare.
4. Download The .zip ROM from source-Download
5. You wont get Google Apps in this Rom, so you have to get the zip for Gapps installation. Download them for CM10.

Let's Start:


1. Download .zip ROM file and kernel file from the link.

2. Connect your phone to PC using USB cable- don't forget to enable USB debugging 

3. Copy both files to the external memory. Don’t extract them. ( Its better to place files on SD). If you want you can place the GApps in phone, copy the files also.

4. Disconnect mobile from PC and Turn it off by long pressing power button.
5. Enter into the bootloader mode. To enter into bootloader mode, Hold Volume Down + Power Button simultaneously until bootloader mode appears.
6. In bootloader menu navigate using volume keys and highlight recovery and enter into recovery mode by pressing Power button. You will now reach Custom recovery.
7. Now wipe "data/factory reset" and then " wipe cache partition " to wipe all the data and caches respectively on the phone.
8. Now let's Flash the ROM. Select install zip from sdcard and then choose zip from sdcard. Then select the CyanogenMod 10 file and install.
9. The installation takes some time to finish. 
Note: If you want to install GAPPS then repeat the step of install zip from sdcard and chose zip from sdcard. But this time chose Gapps package.


10. After successful flashing of both the files, select  +++++Go back+++++  and then reboot system now. Normally the first boot takes quite a lot of time. Please be patient. 


You have successfully Installed Jellybean On HTC Explorer Pico using CM10.


Read full post »

Sunday, 14 April 2013

Root Sony Xperia J JellyBean 11.2.A.0.21 + Unlocked Bootloader

38 comments

How to Root Xperia J JellyBean 11.2.A.0.21


We have already Seen how to root Xperia J other versions-Root Xperia J .28/18

Now lets Root The Xperia J 11.2.A.0.21 JellyBean version


Warning:

Rooting can Void Warranty. Follow these steps exactly and carefully.

Requirements:

1. Unlocked bootloader (You can do it from sony website)
2. Flashtool (download Xperia flash tool)
3. An USB cable
4. Enabled USB Debugging and Tick Non-market app installation
5. All drivers installed
  

Let's Root:


1. Connect Your Xperia J To Your PC
2. Download This Root File- Root_xperi_signed.zip
3. Copy "root_xperia_signed.zip" file to sd card (ext...)
4. Disconect Your Xperia J and switch it off
5. Launch Xperia flashtool
6. Hold volume + button and connect phone with usb cable to pc, you'll saw blue led light (Now You have entered to Fastboot mode)
7. Download this: Boot.img
8. Copy "boot.img" file to flashtool/firmwares
9. Click on lightening icon in flashtool and click fastboot mode 


10. Click "Select kernel to Flash" on right side in flashtool  


11. Browse and choose "boot.img" , flashtool will automaticly flash this file
12. Turn off phone after flashing
13. Turn on phone,when you'll see blue light at bottom phone not the small blue led up, start pressing all volume buttons + and - .
14. If you succed,you'll enter to CWM recovery,click "install zip from ext card" and find "root_xperia_signed.zip" file and flash it.
15. After flashing,click reboot system,but don't wait for reboot,just take battery out for few second and put it back
16. Now download: kernal.sin and copy "kernel.sin" file to flashtool/firmwares
17. Follow step 9 and 10.
18. Disconnect phone and Switch It On.

You Have Successfully Rooted Xperia J 11.2.A.0.21!!


Read full post »

Friday, 5 April 2013

How To Unlock BootLoader - HTC One

3 comments

How To Unlock The HTC One Bootloader


The HTC One uses an all-aluminum frame with an antenna built into its backing; intended to give the device a premium feel in comparison to smartphones made with a plastic shell. The frame itself takes at least 200 minutes to manufacture. Internally, the device includes a 1.7 GHz quad-core Snapdragon 600 processor, 2GB of RAM, a 4.7 inch 1080p Super LCD 3 display with 468 ppi, and either 32 or 64 GB of internal, non-expandable storage. The HTC One will also support LTE where available.


Steps To Unlock The Bootloader :


1.    Go to the htcdev and create an user account using the Register link.

2.    Once registration is complete and you have verified your e-mail, login with the new account and launch the unlock bootloader page.
Click on the direct link to the unlock bootloader page here

3.    Choose the option All Other Supported Models from the drop down menu on the right and then click on Begin Unlock Bootloader page.

4.    A pop-up warning comes up on screen. Now, hit the Yes button.

5.    You will get a prompt to accept some legal terms; tick on both the check boxes and hit Proceed to Unlock Instructions button.

6.    The next page presents you four steps, whose simple explanation is given below:

    Power off the phone and disconnect it from the computer.
    Press and hold Volume down and Power button together until the phone enters Bootloader mode.
    Now, choose Fastboot by tapping Power button.

NOTE: Use the Volume buttons to navigate and Power button to choose the highlighted option in Bootloader mode.

4.    Finally, connect your phone to the computer.

7.    Browse to the second page on the htcdev site and click Proceed to Step 5 button.

8.    On the second page, just ignore anything that htcdev site is saying and instead do the following steps:

    Open Fastboot folder. Now, press and hold down the SHIFT button on the keyboard, then right-click on any empty space of the screen. Finally, click on the Open Command Window Here option in the right-click menu to open a command prompt window.
    Unlock Bootloader and Root HTC One
    Unlock Bootloader and Root HTC One
    In the command prompt window, type the following command: fastboot devices:

       NOTE: This will ensure that your device is detected. If nothing appears on-screen with this command, then it means you don't have the proper drivers installed on computer. Verify that the correct USB drivers are downloaded and installed by reinstalling the HTC Sync Manager. And also restart your computer if required.

9.    On the third page of the htcdev site, click Proceed to Step 8 button at the bottom. Do not forget to keep the command prompt window open.

10.  After you have read all the Steps given on the htcdev site carefully, click on the Submit button.

11.  If all the steps are done correctly, a "Token Submitted Succesfully!" message appears on next page. An e-mail with the unlock key attached as a file will now be sent to your registered e-mail ID.

12.  Access the e-mail you received from HTC, and download the Unlock_code.bin file attached to it.

13.  Copy the Unlock_code.bin to the Fastboot folder, which contains a total of 5 files inside.

14.  Flash the Unlock_code.bin file on the phone using fastboot:

    Enter the following command in the command prompt window: fastboot flash unlocktoken Unlock_code.bin

    An Unlock bootloader request message will now appear on your phone. Use Volume Up button to choose Yes and Power button to confirm and continue.
    The phone will reboot and factory reset itself. It is now safe to disconnect the phone from computer.


15.  HTC One's bootloader is now unlocked. To confirm, boot into bootloader mode (follow Step 6) and the  "UNLOCKED" message will appear at the top of the screen.

The bootloader on your HTC One is now unlocked and you can now root it, install custom ROMs and kernels or make other modifications whenever needed.


Read full post »

Category List