How To Root Nexus 7 [wifi] 2012 Using Wug's Toolkit
[ Applicable To All Android Versions Up To- 4.4.2]
[ This Tutorial Is Based On Android 4.4.2 Kit Kat an Wug Toolkit v1.7.9 ]
Nexus 7 is one of the most reputed tablets available in the android market. Equipped with amazing features and unbelievably low price. This extremely rare combination, made the Nexus 7 the best selling Android tablet.
All that power and you feel like chained. Unable to explore the world of rooting which lies beyond.?
Well you just can't use the Nexus 7 Without rooting.
Warning:
- Rooting voids all kinds of warranty. Do this at your own risk.
- Make sure your device is charged at least 60%
- Back Up all your Personal Data-It will get wiped out during the process.
Let's Begin:
Part 1: Setup
- Download Wug's Nexus Root Toolkit- Link
- Install Root kit on your PC
- It will automatically start Toolkit after installation, if it doesn't start manually.
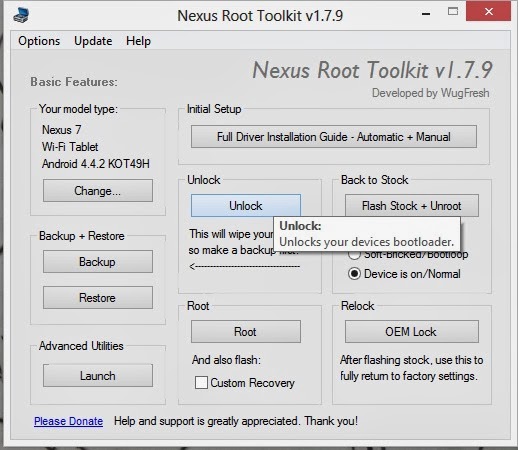
- Now it will ask to specify your Nexus device and android version. I have selected My Nexus 7 2012 Wifi model and , Android 4.4.2 Kit Kat (KOT49H). You could choose your version as such.
- Now It display a window regarding USB connection methods. You have to enable USB Debugging.
- By default, the developer options are unavailable in setting menu. For getting it, go to "About tablet" in settings-->tap on Build number for 7 times, it will display a message that " you are now a developer".
- Now go to settings-->Developer Option-->Enable USB Debugging
- You also need to uncheck "MTP" option in "USB connection" (from Storage option
- Now it will download the boot images and recovery images. Make sure you have internet connection available at the time.
Part 2 - Unlocking
- Open Wug's Toolkit
- Now click on "Unlock" option. Now you will get a message about unlocking. It warns us that all of the data stored in the device will be wiped out. So it is of utmost importance that you back up all your apps and data. Also the tool kit has a backup feature which can backup all your data+app and media files.
- Press OK to continue. Now it will ask you whether to auto reboot into boot loader mode first. If you have connected the device while its on via usb debugging then, the toolkit can automatically send the device to bootloader mode.
- Press Yes, if your device is powered on. Otherwise read the instructions it has provided.
- After pressing OK, it will start the process, messages will be displayed on screen like "Checking ADB status"..., " Device Connected"... "Rebooting your device into Bootloader"..." Fastboot Status"...
- If a message is displayed saying that the device isn't connected, just redo the steps and try again.
- Now on your device you will see a new window showing " Unlock Bootloader". Navigate using Volume keys and select "Yes "using Power key. the unlocking process will initiate.
- After the process is finished, the device will reboot. While on the computer screen, you will see a new message box, containing a list of instructions. These are important. So go through it.
- once the rebooting is complete, you will have to go through the initial setup or you can skip it.
- Enable USB debugging on your device.
- You are ready to root. Finish this by clicking " OK"
You have Successfully Unlocked Your Bootloader. Next Up is Rooting Your Nexus 7.
Part 3- Rooting Nexus 7
- After successfully unlocked , we can safely continue to rooting.
- Next on the tool kit press Root. Below root button,you can choose whether to install Custom recovery or not. Its best to tick that option or it wont do any harm even if you dont tick it. If you want a custom recovery like CWM touch/ TWRP then tick it and start.
Also In order to choose which recovery you need. Go to Option-->Options-->Custom recovery Tab and select anyone you like ( CWM/TWRP)
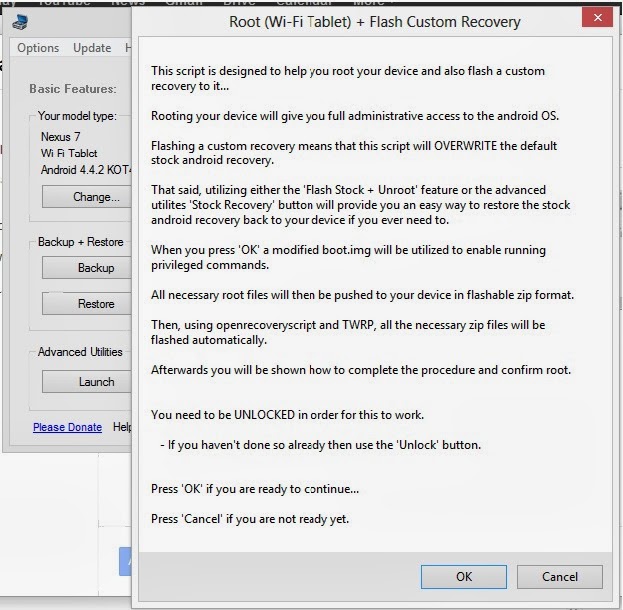
- Now Click on the Root Button and you will receive a message showing some info on rooting and few instructions.
- Press OK and it will continue with the rooting process.
- After some time the process will be completed, the toolkit will push SuperSU and other apps into device. When the process is complete , you will receive a message with instructions to update binaries of SuperSu.
- open app drawer , tap on SuperSU. It will ask you to update binaries. Press continue, make sure you have internet connection. after complettion, press OK. Now go to BusyBox installer and then Grant Super user permissions.
There you go you have successfully rooted your Nexus 7. Enjoy!
Feel free to comment...


hello ,
ReplyDeletei rooted my nexus 7 (2012, WiFi) according to the instructions provided by you and now after following all the steps i successfully rooted my nexus , but now the auto rotate is not working . I would be indebted to you for the whole of my life if you would help me out. i desperately need your help please help me. thanks in advance
yoiu are on kitkat 4.4.2 right?
ReplyDelete1. try sensor tester by Soaus and it has an option to recalibrate sensor.-https://play.google.com/store/apps/details?id=com.Test_Sensors&hl=en
ReplyDeleteburberry sale
ReplyDeletedallas cowboys jersey
bears jerseys
cheap football shirts
uggs outlet
chelsea jersey
nike free run uk
mizuno shoes
steelers jerseys
michael kors outlet
rolex watches,swiss watch,replica watches,rolex watches for sale,replica watches uk,rolex watches replica,rolex watches for sales
toms outlet
cardinals jersey
kyle wilber jersey,jeremy mincey jersey,jeff heath jersey,dez bryant jersey,dan bailey jersey,rolando mcclain jersey,george selvie jersey,larry allen jersey,uche nwaneri jersey,roger staubach jersey,gavin escobar jersey
chanel sunglasses
soccer shoes
coach outlet canada
nhl jerseys wholesale
nike running shoes
chiefs jersey
lance briggs jersey,martellus bennett jersey,jay cutler jersey,sylvester williams jersey
lebron 12 shoes
tommy hilfiger outlet store
vans for sale
michael wilhoite jersey,y.a. tittle 49ers jersey,justin smith jersey,nike 49ers jersey
cheap soccer jerseys
north face outlet online
nike air max 2015
cartier bracelet
nike free uk
a chang 0701
2015710dongdong
ReplyDeleteralph lauren outlet
longchamp outlet
jordan 11
red christian louboutin
jordan shoes
coach outlet store online
christian louboutin
lebron james shoes
ralph lauren
hollister clothing
michael kors
louis vuitton
chanel bags outlet
abercrombie
michael kors bag
toms shoes
fendi bags
louis vuitton
coach outlet store online
jordan 13
coach factory outlet
coach outlet
ray ban outlet
michael kors handbags
jordan 3s
toms outlet
ray bans
cheap jerseys
ray ban sunglasses uk
sac longchamp pas cher
louis vuitton
coach factory outlet
christian louboutin
adidas shoes
timberlands
ray ban sunglasses outlet
louis vuitton handbags
celine outlet
ralph lauren outlet
nike sb
ReplyDeletecoach outlet canada
tods outlet
adidas shoes
canada goose outlet
ugg slippers
ed hardy clothing
fake oakley sunglasses
nike air max
ugg boots clearance
nike running shoes
gucci shoes
louis vuitton outlet
christian louboutin
supra shoes
fitflop uk
chaussure louboutin
christian louboutin uk
north face uk
nike air huarache
moncler jackets
pandora charms
basketball shoes
ed hardy outlet
2015915yuanyuan
lebron james basketball shoes
ReplyDeletetory burch outlet online
coach outlet
cheap uggs
tory burch shoes
official coach factory outlet
uggs on sale
air max 90
pandora charms
louis vuitton purses
kate spade handbags
ugg boots outlet
ralph lauren
replica watches
michael kors outlet
hollister clearance
uggs australia
mont blanc
rolex watches
louis vuitton purses
cheap oakley sunglasses
michael kors outlet
louis vuitton outlet
north face
coach outlet store online
christian louboutin shoes
chanel handbags
ugg boots sale
burberry scarf
coach outlet
michael kors outlet
hollister kids
cheap air jordans
cheap jordans
canada goose outlet
nike trainers uk
michael kors outlet online
20151231yuanyuan
chenlili20160316
ReplyDeletekevin durant shoes
ralph lauren sale
coach factory outlet online
louis vuitton outlet
coach factory outlet
michael kors canada
coach outlet store online
coach outlet
gucci handbags
abercrombie clothing
cheap rolex watches
louis vuitton handbags
cheap basketball shoes
michael kors outlet online
concords 11
michael kors outlet
oakkey sunglasses
adidas uk
michael kors outlet
louis vuitton outlet
oakley sunglasses
canada goose sale
louis vuitton outlet
louis vuitton outlet
replica rolex watches
air max 95
canada gooses outlet
cheap ray ban sunglasses
air force 1 trainers
oakley outlet
air jordan 4
tory burch outlet
coach outlet online
ralph lauren home
mont blanc mountain
adidas originals store
ghd hair straighteners
gucci outlet online
louis vuitton bags
air max 95
designer handbags wholesale
ReplyDeletereebok shoes
fake oakleys
ralph lauren
yeezy boost 750
michael kors outlet
hollister uk
sac longchamp
converse sale
michael kors outlet online
adidas nmd black
adidas pure boost black
bottega veneta sale
armani outlet
coach purses on sale
coach factory outlet
michale kors uk
michael kors outlet stores
polo ralph lauren outlet online
prada handbags
adidas shoes
cheap oakleys
fitflops shoes
ray ban sunglasses sale
rolex submariner
lacoste shoes
adidas shoes
michael kors outlet clearance
michael kors canada
nike blazer
michael kors outlet
ray ban sunglasses outlet
hermes belt
pandora charms
under armour
michael kors handbags
ralph lauren pas cher
cheap oakleys
coach factory outlet online
xiaowei 20160504